Note: Ensure the video doorbell has been activated on Dealer Admin before using Virtual Keypad. For more information, refer to Dealer Admin Help: Setup VUE Video Doorbell.
The VUE Video Doorbell supports a hybrid storage system, using on-board SD card storage for local recording and cloud upload for remote backup and retrieval.
Once activated, you can configure doorbell settings like chime, microphone, and detection analytics on Virtual Keypad. Video clips are viewable on Virtual Keypad.
Refer to the following information:
View Video Doorbell Live View
-
Log in to the Virtual Keypad app and enter your User Code.
-
Select the

-
Select the doorbell you want to view, then select View Live. The doorbell’s live view displays. To exit live view, swipe right on the screen. Refer to the information below to complete the following actions when in live view:
Arm or Disarm
Select the .png?cb=3de692c11b615e45fe8f3b4fe51a08b0)
Access Door
Select the 
Activate Favorite
Select the 
Start Call
Select the 
End Call
Select the 
Mute/Unmute Sound
To mute sound, select the 
To unmute sound, select the .png?cb=abb9344281d5c15852122b71e09b6330)
.png?cb=cc409f74578b94b5a3eade918d677ab4)
Configure Video Doorbell Settings
To configure settings for your doorbell, complete the following steps:
-
Go to the Virtual Keypad app, then enter your User Code.
-
Select the
-
Select the doorbell you want to configure settings for.
-
Select the

-
Enter a name for the doorbell.
-
In Video Quality, select >, then select Low, Medium, or High to determine the video quality.
-
In Access Control, select >, then select a door you want to associate with the video doorbell.
Note: If doors are not displaying in Access Control, ensure a door has been added in panel programming and Door Control is enabled on Dealer Admin. For more information, refer to Dealer Admin Help: Add a Door as a Device and Dealer Admin Help: Enable Door Control.
-
In Microphone Level, use the slider to adjust the microphone level volume.
-
Toggle Detect Tamper ON to enable tamper detection.
-
In Time Zone, select >, then choose a Timezone.
-
Toggle Observe DST ON if you want the doorbell to observe Daylight Saving Time.
Set Up Regions
Note: You can create up to four regions per doorbell.
To create regions for your doorbell, complete the following steps:
-
Go to the Virtual Keypad app, then enter your User Code.
-
Select the
-
Select the doorbell you want to configure settings for.
-
Select the
-
Select Set Up Regions. A blue box appears in the middle of the camera view screen.
-
Select the box, then drag it across the camera view to place it in the desired detection region. Select and drag the white circles on the corners of the box to manipulate the region.
-
In Sensitivity, use the slider to adjust the how sensitive motion detection is.
-
Toggle People, Vehicles, Package, or any combination of the three ON if you want the camera to detect any of those options.
Note: You can only create a detection region for Packages in Region #1.
.png?cb=a31d8aeacd52151e5814a11acb1046b5)
-
Select Save in the upper right corner or select the

-
Region #1 — Blue
-
Region #2 — Red
-
Region #3 — Green
-
Region #4 — Yellow
-

View Doorbell Details
To view the doorbell’s details, complete the following steps:
-
Go to the Virtual Keypad app, then enter your User Code.
-
Select the
-
Select the doorbell you want to configure settings for.
-
Select the
-
Select Doorbell Details to view the following information:
-
Name
-
MAC Address
-
Serial Number
-
Last Check-In
-
Wireless Signal Strength
-
View Video Doorbell Events
Motion detection events populate in Virtual Keypad when a region is configured in the video doorbell settings but video analytics (person, package, or vehicle detection) are not assigned to that region. Every time motion is detected, the video doorbell records the clip and displays it in Events.
Analytic detection events (person, package, or vehicle) populate in Virtual Keypad when a region is configured, and video analytics are assigned to that region in the video doorbell settings. For example, when a region is configured to detect packages. When a person, vehicle, or package is detected within the defined region, the video doorbell records the clip and displays it in Events.
To view video doorbell events, complete the following information:
-
Go to the Virtual Keypad app, then enter your User Code.
-
Select the
-
Select the doorbell you want to view events for. The Event History displays with the following information (if enabled) with the date, time, and recorded clip:
-
Ring — When someone rings your doorbell
-
Motion — When motion is detected (motion detection event)
-
Person (if enabled) — When a person is detected (analytic detection event)
-
Vehicle (if enabled) — When a vehicle is detected (analytic detection event)
-
Package (if enabled) — When a package is detected (analytic detection event)
-
Tamper (if enabled) — When the tamper is triggered
-
Select an event to view the recorded clip.
.png?cb=88491ec028dab45f66e9e8c34dca68cc)
Download Doorbell Clips
To view video doorbell events, complete the following information:
-
Go to the Virtual Keypad app, then enter your User Code.
-
Select the
-
Select the doorbell you want to download event clips for.
-
The clip downloads, and you can save it to where you desire on your phone.
Filter Doorbell Clips
To filter doorbell clips, complete the following information:
-
Go to the Virtual Keypad app, then enter your User Code.
-
Select the
-
Select the doorbell you want to filter event clips for:
-
Select the

-
In the Date Range drop-down menu, select one of the following options to filter event clips by the date:
-
Today
-
Yesterday
-
Previous 7 Days
-
Previous 30 Days
-
Custom Date Range
-
-
In the Event Type drop-down menu, select the checkbox for any of the following options to filter event clips by analytic detections:
-
Person Detected
-
Vehicle Detected
-
Package Detected
-
Additional Information
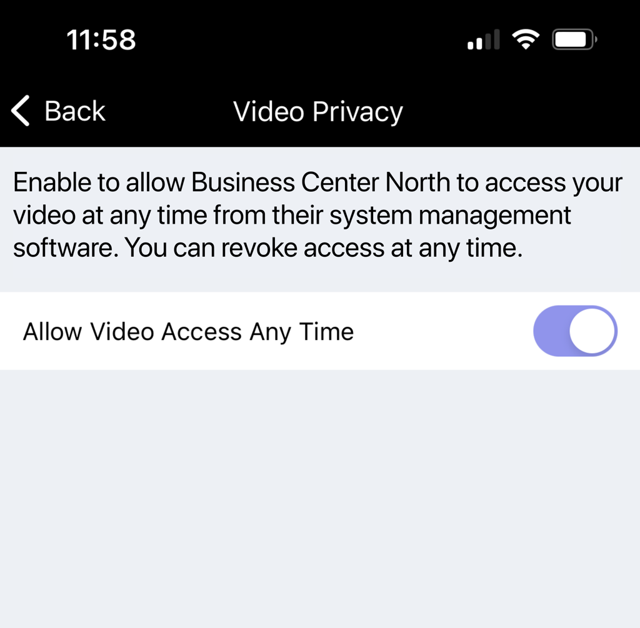
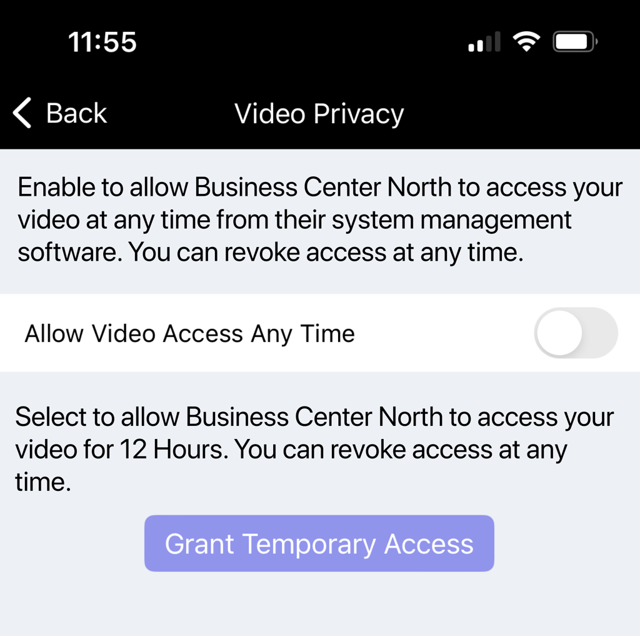
Enable Video Access to Technicians and Dealers
Note: All cameras brought online are immediately granted access to the video feed for 12 hours.
In Virtual Keypad, you can choose to allow video access to technicians and dealers. When video access is enabled, all Administrator level app users receive a notification email. To enable video access, follow the steps below:
-
Go to the Virtual Keypad app, then enter your User Code.
-
Select the
-
Toggle Allow Video Access Any Time ON to grant technicians and dealers unlimited access to the video feed. If Allow Video Access Any Time is toggled OFF, you can enable Grant Temporary Access to allow technicians and dealers access to video for 12 hours. Access can be revoked instantly by selecting Revoke Access or disabling All Video Access Any Time.
Enable Push Notifications
Note: If you want to receive push notifications for detection regions, ensure regions are configured. To configure detection regions, refer to Set Up Regions.
Subscribe to push notifications on your video doorbell for online, offline, and defined detection regions.
-
Go to the Virtual Keypad app, then enter your User Code.
-
Select the
-
Go to Push Notifications, then select Doorbells.
-
Push notifications are enabled by default. Toggle Push Notifications OFF to disable push notifications.
-
If Push Notifications are enabled, select the toggle for any of the following doorbell detections you want to be notified for:
-
Ring
-
Person
-
Vehicle
-
Package
-
Tamper
-
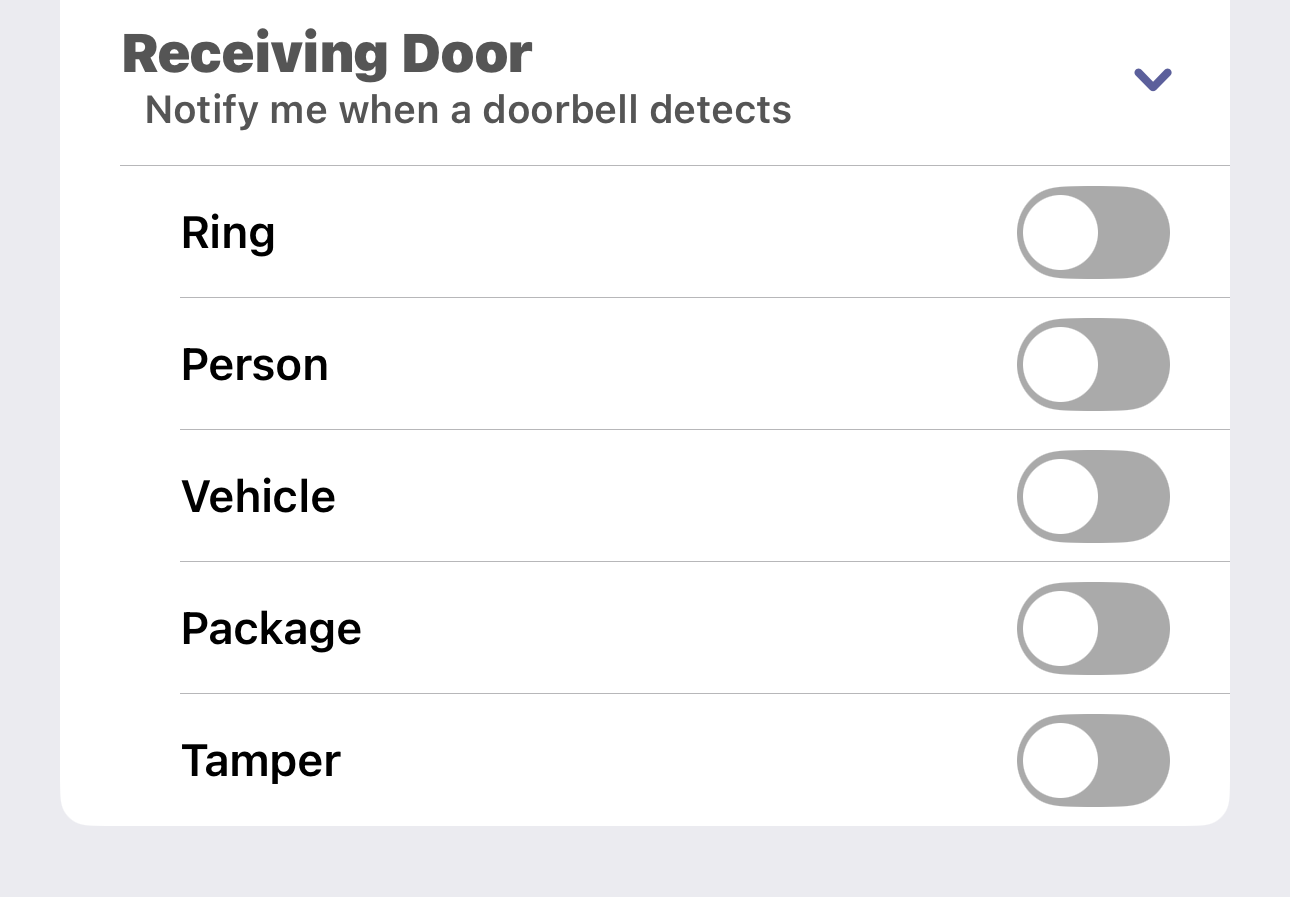
Note: If you do not see the Person, Vehicle, or Package toggles, detection regions are not set up. To configure detection regions, refer to Set Up Regions.
-
Select Save in the upper right corner. You will receive a push notification any time the there is a doorbell detection.
Reconnect the Doorbell to Wi-Fi
Note: Ensure that you know the Wi-Fi network and password that you wish to connect the doorbell to and that the network provides a 2.4 GHz or 5.0 GHz Wi-Fi signal.
If your Wi-Fi network name and password has changed, you can update the Wi-Fi information for your video doorbell through Virtual Keypad.
If the doorbell is already mounted, complete the following steps to remove the doorbell from the backplate. If the doorbell is not mounted, skip to Step 3.
-
Use a SIM ejector tool or paper clip and insert the rounded end in the pinhole insert. The doorbell releases from the mounted backplate.
-
Lift and pull the doorbell to remove the it from the backplate.
-
Remove the back tab from the doorbell, then locate the RST button on the back of the doorbell.

-
Use the straight end of a SIM ejector tool or paper clip and press the RST button for five seconds. This only resets the doorbell’s network settings. When the doorbell is ready to connect, the LED flashes red quickly and the doorbell plays the following message: “Please scan the Wi-Fi QR Code with the doorbell camera.”
Note: Pressing the RST button for 15 seconds resets the doorbell to its factory default settings. Ensure you only press the RST button for five seconds to reset the network settings.
-
Log in to the Virtual Keypad App, then enter your User Code.
-
Select the
-
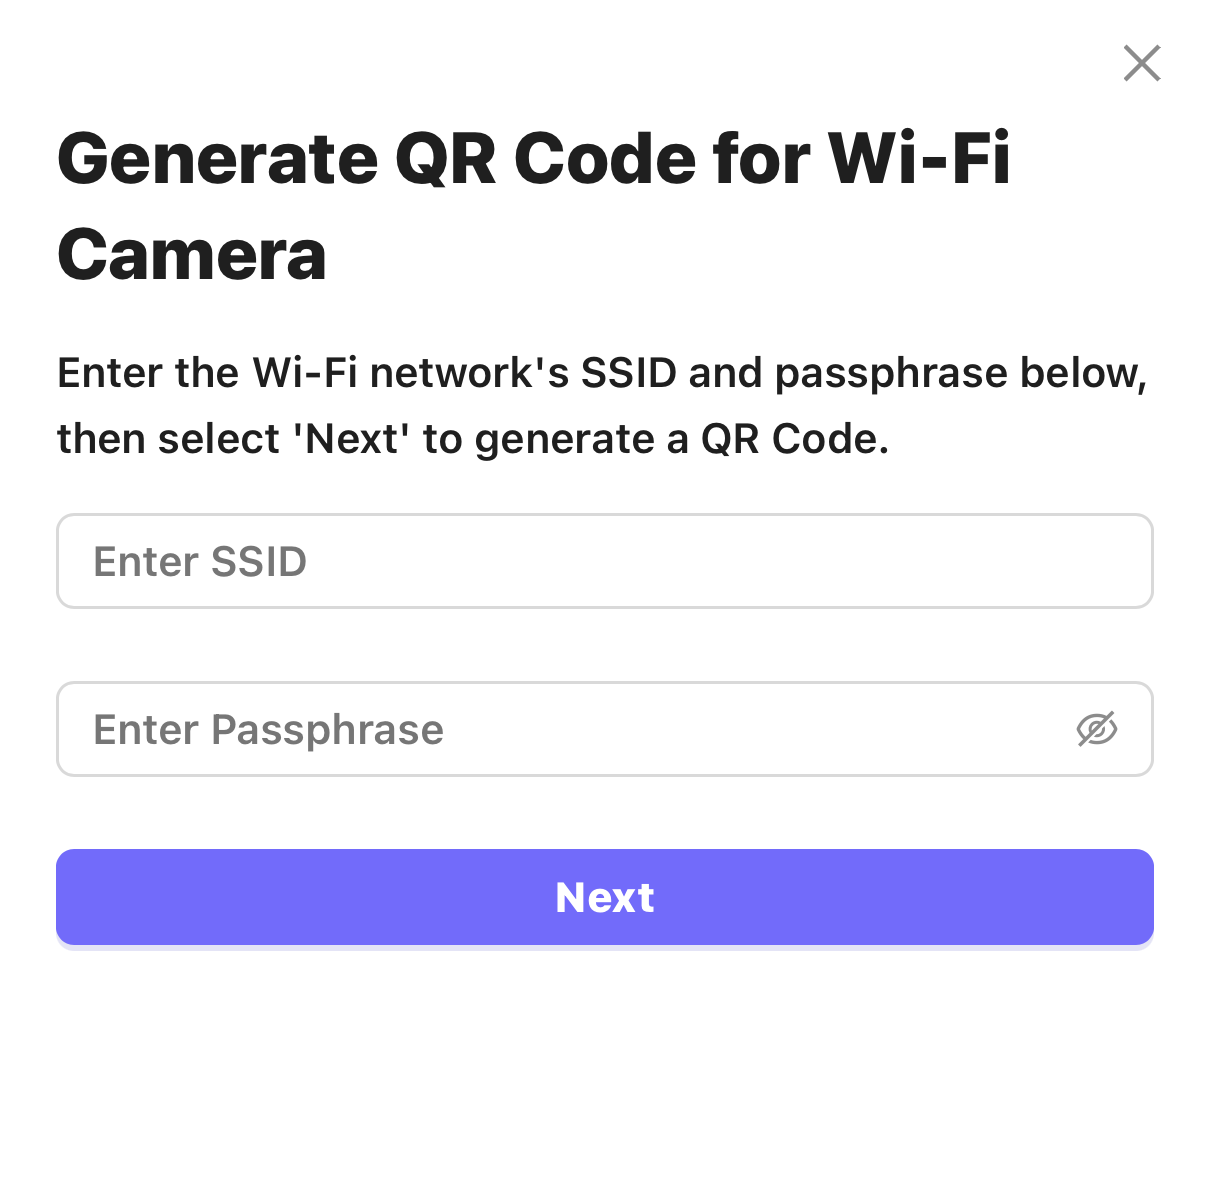
Select Generate QR Code.
-
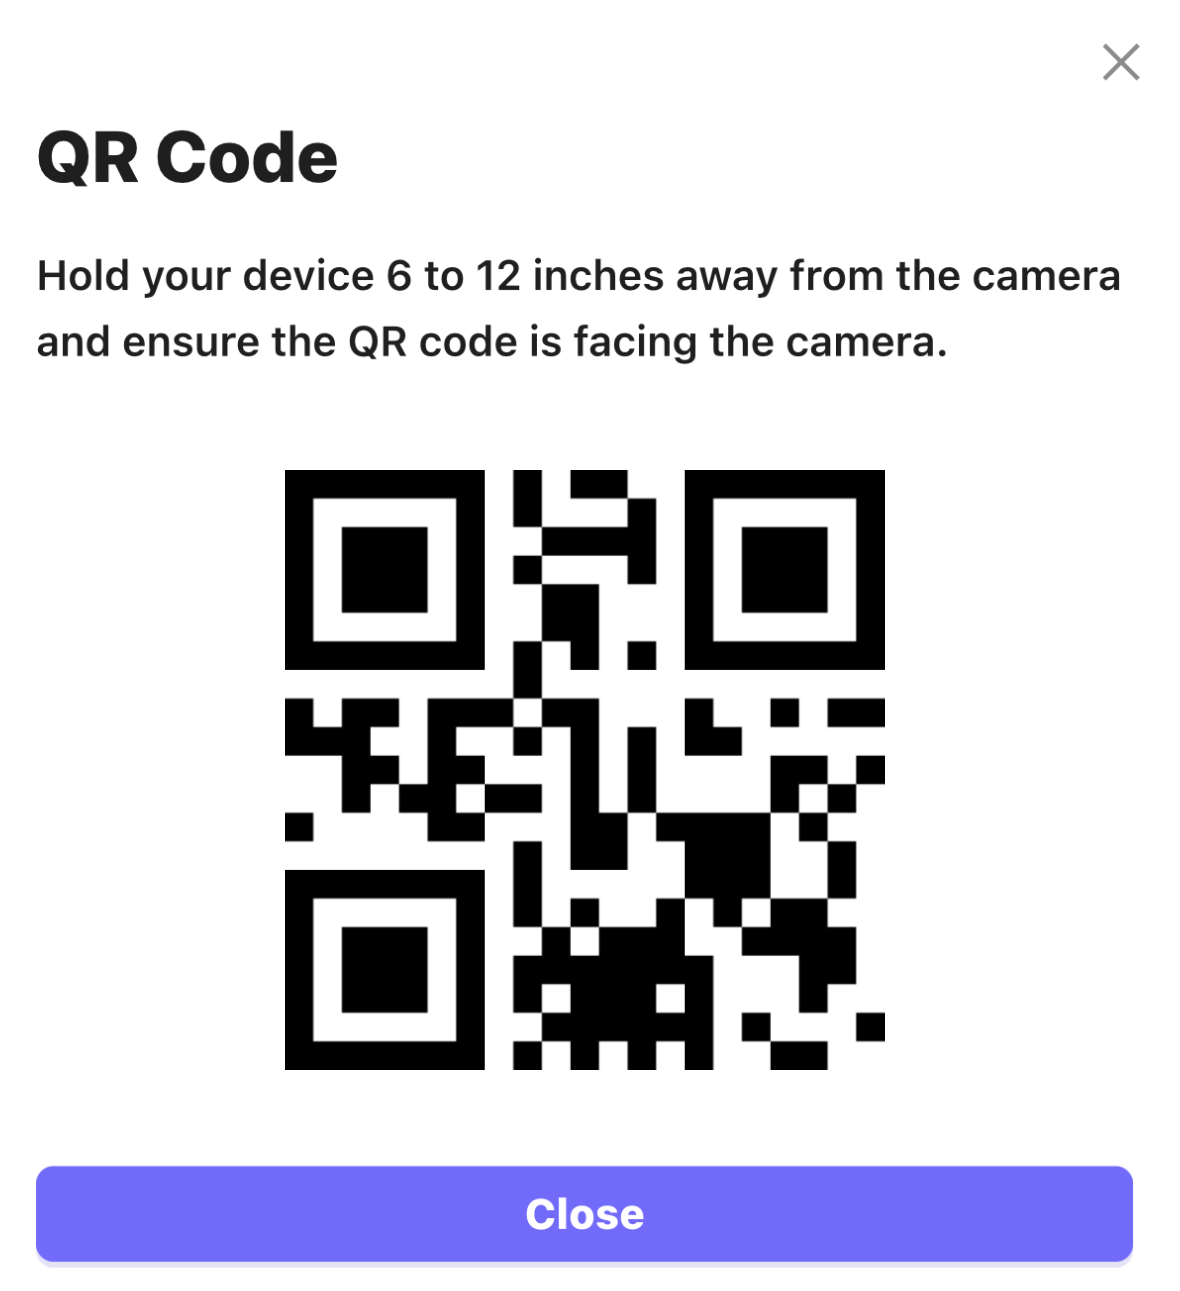
Enter the Wi-Fi network’s SSID and Passphrase, then select Next. A QR code displays.
-
Hold the QR code 6-12 inches away from the front of the camera lens until the LED flashes blue. When the doorbell is successfully connected, it plays the following message: “Wi-Fi connected successfully.”
Note: If the doorbell does not connect to Wi-Fi, it plays the following message: “Wi-Fi pairing failed. Please try again.”
-
Once the doorbell is connected, select Close.